Showing posts with label Simply Cards & Papercraft. Show all posts

Monday, 26 February 2018

Z-fold card designs

Craft Stash are sharing a Master Class that I created for Simply Cards and Papercrafts Issue 165 on their blog, there are step by step instructions with photographs detailing how to create a simple Z-fold and also a more advanced design.

Pop over and take a look HERE if you fancy have a go at creating a Z-Fold card and you are not quite sure how to go about it.


Thank you for popping in today, your company is much appreciated.

Pauline
x

Thursday, 9 November 2017

60 Years Young

This is the final card that I created for Simply Cards & Papercraft using the Apple Blossom Large Numbers and Suffixes die set along with the matching stamp set.


I created the background by die cutting the numbers from card stock and adhering them to the card front.


I die cut and heat embossed the '60' and 'Years Young' sentiment and then added lots of gems around the outside.


Thank you for popping in today, please leave a comment so that I can come and visit you.

Pauline
x

Sunday, 5 November 2017

Happy 80th Birthday

This is another of the cards that I created for the latest edition of Simply Cards & Papercraft, I was sent the Apple Blossom Large Numbers and Suffixes die set along with the matching stamp set.


I used papers from NitWit Collections and created the rosette with my Tim Holtz Paper Rosette Die.


I cut all of the circles with Spellbinders dies and created the sentiment flags with Die-namics dies.


Thank you for visiting my blog today, your company is much appreciated.

Pauline
x

Wednesday, 1 November 2017

Look Who's 70

This is another of the Milestone cards that I created for the latest edition of Simply Cards & Papercraft.  I was sent the Apple Blossom Large Numbers and Suffixes Die Set and co-ordinating stamp set.


I created a Circle Swing Card using my Crafter’s Companion Die’sire Circle Swing Card Die and some papers from the First Edition The Promise 8 x 8” Paper Pad and Gold Mirror Card Stock.  I stamped and embossed the sentiment and numbers with Gold Embossing Powder before cutting out the numbers with the matching dies.


Thank you for visiting my blog today, please leave a comment so that I can come and visit you.

Pauline
x

Saturday, 21 October 2017

Diamond Wedding Anniversary

This is another of the cards that I created for the latest edition of Simply Cards & Papercraft.


I was sent the Apple Blossom Large Numbers and Suffixes die set along with the matching stamp set to use, for this card I cut the numbers from glitter card stock.


I used some beautiful papers from the First Edition The Promise
8 x 8” Paper Pad and computer generated the sentiment.


Thank you for visiting my blog today, please leave a comment so that I can come and visit you.

Pauline
x

Thursday, 19 October 2017

90th Birthday Wishes

The latest edition of Simply Cards & Papercraft is in the shops today and I am thrilled to have six cards using the super Apple Blossom Large Numbers die set and matching stamps featured.


This is one of the cards that I created - I stamped and die cut the numbers and heat embossed them.
 

The papers are from the Nitwit Collections Cottage Charm Bundled Collection and I used one of my Die-namics Fishtail Flags Dies and some Tattered Lace Flower Dies.


Make sure you pick up a copy of the magazine, there is a fabulous free stamp and die set and lots of super inspiration.

Thank you for visiting my blog today, your company is much appreciated.

Pauline
x

Sunday, 15 October 2017

Have a great Day

Another card using Craftwork Cards products today, this time I used the Cottage Garden Spring Collection from the A Pocket full of Paper USB.


I copied the bird house into Microsoft Word and flipped the image so that I could have one of them facing the opposite way, I then printed them and fussy cut them before adding them to my card with foam pads - the little chains that are hanging them up are a stamp that was free with Simply Cards & Papercraft magazine.


The sentiment is from the USB and the flowers are from the October Stamp Club Add On Stamps. 


Thank you for visiting my blog today, your company is much appreciated.

Pauline
x

Sunday, 27 August 2017

Another Tutorial

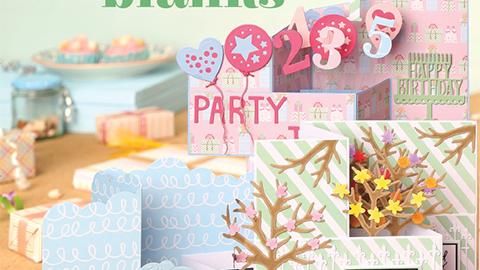
If you are a regular visitor to my blog you might remember a series of Z-fold cards that I created for Simply Cards & Papercraft magazine.

As part of the commission I created two step by step tutorials, I have already shared the beginner design HERE - this is the more advanced design.

This is the finished card.


Score a 30 x 21 cm piece of blue card stock at 7.5 cm and 15 cm. Trim a 6cm strip from the bottom of the card stock. Trim the larger piece of card stock diagonally from a point 9.5 cm from the bottom left corner to the top right corner.


Valley fold both pieces of card stock along the 15 cm score line and mountain fold along the 7.5 cm score line. Cover the front panels with patterned paper leaving a narrow border.


Adhere the smaller panel to the front of the card to form the Z shape.


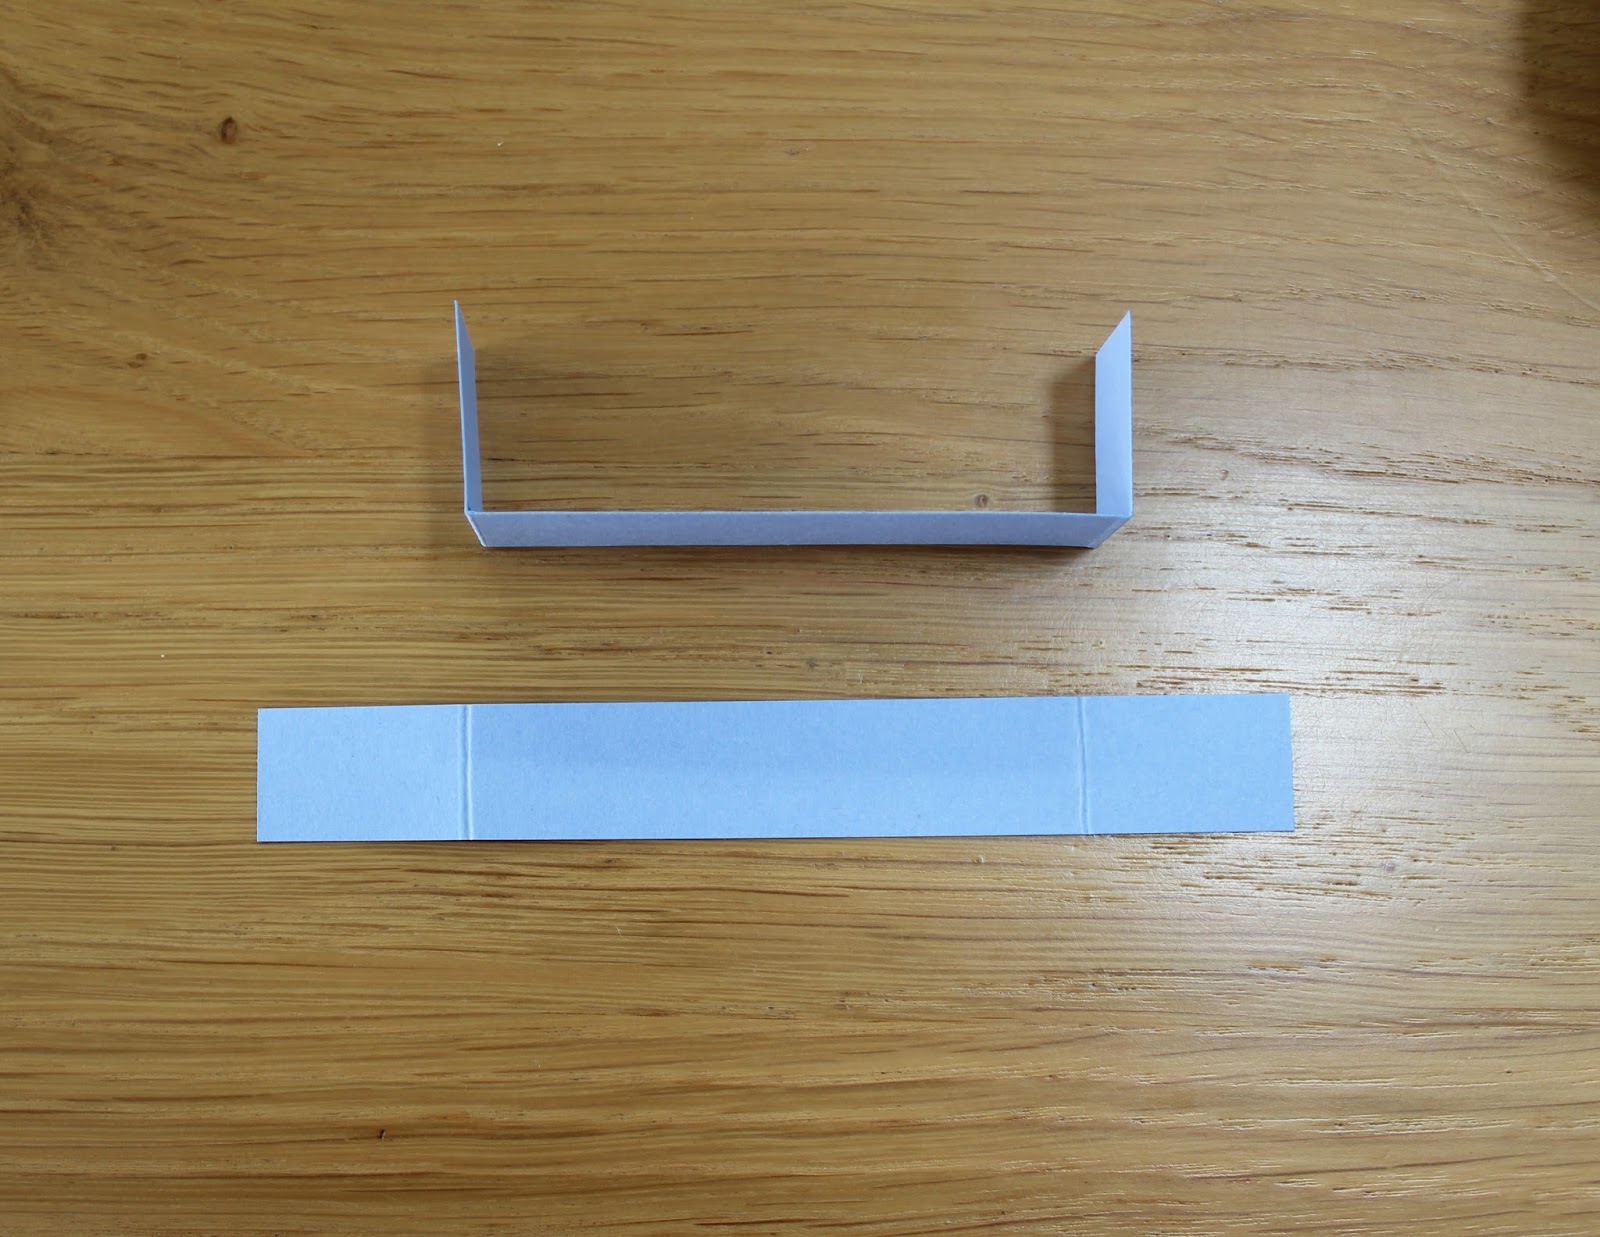
Cut two 12.3 x 1.5 cm strips of blue card stock and score at 2.5 cm from each edge, fold along the score lines.


Attach to the inside of the box that has been formed in the centre of the card.


Repeat with the second strip of card stock to form a pop up box.


Attach a selection of balloons and numbers to the blue tabs using acetate and decorate the front panels of the card as required.


I hope this step by step is helpful to those of you that haven't created a Z-fold card yet.

Thank you for visiting my blog today.

Pauline
x
Friday, 18 August 2017

A quick tutorial

If you are a regular visitor to my blog you might remember a series of Z-fold cards that I created for Simply Cards & Papercraft magazine.

As part of the commission I created two step by step tutorials and as the magazine is no longer available I thought I would share one of them on my blog.

This is the finished card, it is a beginner design.


Score a 30 x 20 cm piece of card stock at 7.5 cm and 15 cm.


Trim 5 cm from the card stock to create two separate panels.


Valley fold both pieces of card stock along the 15 cm score line and mountain fold along the 7.5 cm score line.


Rotate the smaller panel and cover the front panels with pattered paper, I always leave a narrow border around the outside.


Adhere the narrower strip to the card front to form the 'Z' shape.


Decorate as desired.


I hope this step by step is helpful to those of you that haven't created a Z-fold card yet.

Thank you for visiting my blog today.

Pauline
x

Saturday, 29 July 2017

Party Time

This is the final Z-fold card that I created for this months Simply Cards & Papercraft Magazine. I was commission to produce a Masterclass on making Z-fold cards using the Trimcraft Make a Wish paper pad.


The balloons, numbers and birthday cake are all from the Crafter’s Companion Sara Davies Birthday Party Signature Collection. The letters are from the Lawn Fawn Finley’s ABCs Die collection.


This photograph shows the inside of the card ready to have the elements attached.

I really enjoyed making these cards, it was quite a challenge to create six especially as it's not a style that I normally make.

Thank you for visiting my blog today, your company is much appreciated.

Pauline
x

Wednesday, 26 July 2017

Birthday Garden

This is one of the advanced Z-fold cards that I created for this months Simply Cards & Papercraft Magazine. I was commission to produce a Masterclass on making Z-fold cards using the Trimcraft Make a Wish paper pad.


I created the trees with my Crafter’s Companion Die’sire Four Seasons Die, the little flowers are all separate and I coloured them with Spectrum Noir Illustrator Pens.  The fence is from the Polkadoodles Elegant Lamplight & Gate Die set and the sentiment is a Paper Smooches Stamp.


There is a step by step tutorial in the magazine explaining how to create these cards.

Thank you for popping in today, your company is much appreciated.

Pauline
x

Sunday, 23 July 2017

Let's Party

This is the second of the beginner Z-fold cards that I created for this months Simply Cards & Papercraft Magazine. I was commission to produce a Masterclass on making Z-fold cards.


I used the Trimcraft Make a Wish 12” x 12” Paper Pad for all of the cards in the series, for this one I added a die cut sentiment and stamped sentiment from the Crafter’s Companion Sara Davies Birthday Party Signature Collection.


These cards really are quite simple to create, I produced a step by step guide for the magazine, make sure you check it out.


Thank you for visiting my blog today, your company is much appreciated.

Pauline
x
Friday, 21 July 2017

Floral Lattice

This is the third of six cards that I have published in this months Simply Cards & Papercraft Magazine. I was commission to create a Masterclass on making Z-fold cards.

This is the second of the intermediate designs.


I used the Trimcraft Make a Wish 12” x 12” Paper Pad along with some dies from a couple of Sara Davies Signature Collections. The pink flowers are a Joy Crafts Stamp, I stamped them with pink ink and fussy cut them.


I really enjoyed making these cards, it's not something that I normally do - they are certainly a challenge to photograph.

Thank you for visiting my blog today, your company is much appreciated.

Pauline
x

Tuesday, 18 July 2017

New Baby Boy

This is another of the Z-fol cards that I have published in this months edition of Simply Cards & Papercraft.  I was really honoured to be asked to produce the Masterclass this month - I was commissioned to create six cards - two beginner designs, two intermediate and two advanced. This is one of the beginner designs.


I was sent the Trimcraft Make a Wish 12” x 12” Paper Pad to use and I paired it with stamps and dies from the Crafter’s Companion Sara Davies Little Angel Signature Collection.


Thank you for visiting my blog today, your company is much appreciated.

Pauline
x

Thursday, 13 July 2017

Birthday Bunting

Issue 165 of Simply Cards & Papercraft is in the shops today so I can share some of the cards that I have in this months magazine.

I was really honoured to be asked to produce a Masterclass all about creating Z-fold cards. I was commissioned to create six cards - two beginner designs, two intermediate and two advanced. This is one of the intermediate designs.


I was sent the Trimcraft Make a Wish 12” x 12” Paper Pad to use and I paired it with dies from the Crafter’s Companion Sara Davies Birthday Party Signature Collection. The little parcels are from Stamps by Chloe, the buttons, ribbon & twine are all from my stash.


Make sure you pick up a copy of this months magazine, it has lots of beautiful cards in it and the free gift is a fabulous bird stamp set and die along with some beautiful Prima papers.

Thank you for visiting my blog today, your company is much appreciated.

Pauline
x