I have created this card with the August Julie Loves Creativity Box - this one is called Sweet & Petite, it is really pretty.
I seem to be in CAS mode at the moment, I'm really enjoying making some less complicated cards than usual.
Everything is from the Creativity Box with the exception of the twine.
Thank you for visiting my blog today, please leave a comment so that I can come and visit you.
Pauline
x
Thursday, 31 August 2017
Wednesday, 30 August 2017
Get lost (in a good book)
This is my card for this weeks Less is More Challenge - the theme is Use A Real Object, I have used a paperclip and a staple on my card.
The cute little Book Worm and book are Clearly Besotted stamps, I coloured them with ProMarkers and cut the worm out with the corresponding die - I fussy cut the book as this didn't have a die.
I used a Die-namics die to cut the torn notebook edge and the graph papers are from Echo Park. I computer generated the sentiment as I didn't have the add on stamps that came with the Book Worm set.
I would like to enter this card into this weeks Less is More Challenge 343 - Use A Real Object.

Thank you for visiting my blog today, your company is much appreciated.
Pauline
x
The cute little Book Worm and book are Clearly Besotted stamps, I coloured them with ProMarkers and cut the worm out with the corresponding die - I fussy cut the book as this didn't have a die.
I used a Die-namics die to cut the torn notebook edge and the graph papers are from Echo Park. I computer generated the sentiment as I didn't have the add on stamps that came with the Book Worm set.
I would like to enter this card into this weeks Less is More Challenge 343 - Use A Real Object.

Thank you for visiting my blog today, your company is much appreciated.
Pauline
x
Labels:
Banner,
CAS,
Clearly Besotted,
Die-namics,
Echo Park,
Less is More,
ProMarkers
Tuesday, 29 August 2017
Baskets full of Love
I should have posted this card yesterday but as I had another DT card to post I decided to save this one for today.
The latest challenge at Ooh La La Creations started yesterday and the theme for the next fortnight is Lace chosen by Tez. I have created a fun card using a sweet image and papers from the Ooh La La Creations Everyday Occasions CD.
The image and all of the papers come from the CD, I cut a scalloped border with a Clearly Besotted die and added some buttons tied with twine. The sentiment is from another Ooh La La Creations CD.
Make sure you pop over to the Ooh La La Creations Challenge Blog and check out the DT inspiration, we would love for you to join us for our Lace Challenge.
Thank you for visiting my blog today, please leave a comment so that I can come and visit you.
Pauline
x
Monday, 28 August 2017
Christmas Kisses
It's time for a new challenge at Christmas with the Cuties and the theme this month is Cute Couples.
I used the adorable Snowman Couple image from our sponsor Bugaboo to create my card.
I coloured my couple with a combination of ProMarkers and Spectrum Noir Illustrator Pens. I then added glitter to the Snowladies hat and the snow on the ground along with some 3D Crystal Lacquer to their buttons.
I cut them out with a Sue Wilson pierced square die and layered them up onto some green card stock, I repeated with another layer of white and green card stock before attaching them to my card front. The sentiment is from Kraftwork cards layered onto a Tattered Lace Charisma Frames 2 die cut from the green card stock.
Make sure you pop over to the Christmas with the Cuties challenge blog and take a look at the Design Team inspiration, we would love for you to join us for our Cute Couples challenge.
I would like to enter this card into the August Rudolph Days Challenge, the theme is Anything Christmas Goes.
Thank you for visiting my blog today, your company is much appreciated.
Pauline
x
Sunday, 27 August 2017
Another Tutorial
If you are a regular visitor to my blog you might remember a series of Z-fold cards that I created for Simply Cards & Papercraft magazine.
As part of the commission I created two step by step tutorials, I have already shared the beginner design HERE - this is the more advanced design.
This is the finished card.
Score a 30 x 21 cm piece of blue card stock at 7.5 cm and 15 cm. Trim a 6cm strip from the bottom of the card stock. Trim the larger piece of card stock diagonally from a point 9.5 cm from the bottom left corner to the top right corner.
 Valley fold both pieces of card stock along the 15 cm score line and mountain fold along the 7.5 cm score line. Cover the front panels with patterned paper leaving a narrow border.
 Adhere the smaller panel to the front of the card to form the Z shape.
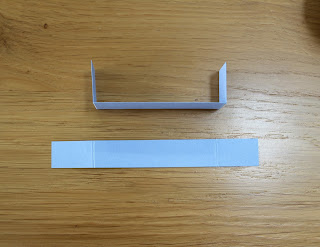
Cut two 12.3 x 1.5 cm strips of blue card stock and score at 2.5 cm from each edge, fold along the score lines.
Attach to the inside of the box that has been formed in the centre of the card.
 Repeat with the second strip of card stock to form a pop up box.
Thank you for visiting my blog today.
Pauline
x
Saturday, 26 August 2017
Floral 21st
This is the final 21st Birthday card that I made for Hannah, this one was from me and hubby.
I used the beautiful Petals & Parasols Collection from NitWit Collections. I created the rosette with my Tim Holtz die and layered it onto a Spellbinders scalloped circle die cut - the numbers were cut with a Tonic die.
The sentiment is a Die-namics die and I stamped and fussy cut some Joy Crafts flowers - the leaves are a Sue Wilson die.
I decorated the inside of the card using the same papers and an insert from the NitWit collection.
Thank you for calling today, your company is much appreciated - please leave a comment so that I can come and visit you.
Pauline
x
Labels:
Die-namics,
Joy Crafts,
NitWit Collections,
Spellbinders,
Sue Wilson,
Tim Holtz,
Tonic
Friday, 25 August 2017
A wonderful holiday
Matt and Hannah went on holiday to Cyprus recently and Matt asked me to make a layout using a couple of their favourite photographs.
I used papers from the Sara Davies Shabby Chic Signature collection and created some die cut flowers using some Tattered Lace Dies - the leaves are a Sue Wilson die. I die cut the Cyprus letters with a Memory Box die, I cut them twice - once from pink and once from green so that I could inlay them. I also inked the edges of everything with Distress Ink.
Thank you for visiting my blog today, your company is much appreciated.
Pauline
x
Thursday, 24 August 2017
Let's Cook
I've managed to create another card with this month's Love From Lizi kit - everything is from the kit with the exception of the button and string.
The topper is velum so I adhered it to some pale yellow card stock using my Xyron Creative station.
I used my Die-namics die to cut the little banners and a Tattered Lace Die to cut the flower.
Thank you for calling today, your company is much appreciated - please leave a comment so that I can come and visit you.
Pauline
x
Wednesday, 23 August 2017
Best wishes on ...
This is the card that I made for my eldest son to give his girlfriend on her 21st Birthday - he likes shabby chic/vintage designs.
I used papers from the Sara Davies Shabby Chic Signature collection along with a Crafter's Companion die.
I have inked the edges of everything and layered the butterflies up for dimension. The sentiment is from the DigiStamp Boutique cut out with a Spellbinders die. I also decorated the inside of the card.
Thank you for visiting my blog today, your company is much appreciated.
Pauline
x
Tuesday, 22 August 2017
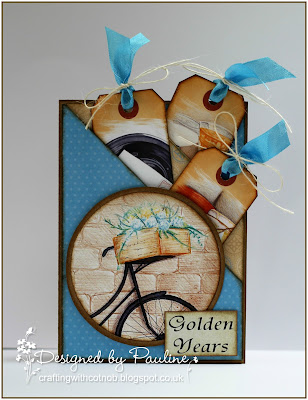
Golden Years
I have made this card to enter the current CD Sunday Challenge - the theme is Past Times.
I have used my Crafter's Companion Downton Abbey CD, this is one of the projects on CD 3 - it is a Double Pocket Card.
Eveyrthing comes from the CD with the exception of the sentiment, ribbon and twine - these are all from my stash.
I have used Kraft card stock for my base and inked the edges of everything with frayed burlap Distress Ink.
I would like to enter this card into the CD Sunday Challenge - Past Times.
Thank you for calling today, your company is much appreciated - please leave a comment so that I can come and visit you.
Pauline
x
I have used my Crafter's Companion Downton Abbey CD, this is one of the projects on CD 3 - it is a Double Pocket Card.
Eveyrthing comes from the CD with the exception of the sentiment, ribbon and twine - these are all from my stash.
I have used Kraft card stock for my base and inked the edges of everything with frayed burlap Distress Ink.
I would like to enter this card into the CD Sunday Challenge - Past Times.
Pauline
x
Monday, 21 August 2017
21st Birthday Wishes
This is the card that I made for my youngest son to give Hannah for her Birthday, we went out for a lovely meal with her and her family to celebrate on Saturday night .
I used papers from the Dovecraft Back to Basics Baby Steps collection - it is a baby collection but there are several pretty papers that are suitable for all occasions.
I paper pieced my Woodware Huge stamp and cut the Hannah with Lawn Fawn dies, I cut the name from grey card stock and then again with from yellow so that I could inlay them.
Thank you for visiting my blog today, your company is much appreciated.
Pauline
x
I used papers from the Dovecraft Back to Basics Baby Steps collection - it is a baby collection but there are several pretty papers that are suitable for all occasions.
I paper pieced my Woodware Huge stamp and cut the Hannah with Lawn Fawn dies, I cut the name from grey card stock and then again with from yellow so that I could inlay them.
Pauline
x
Sunday, 20 August 2017
Twenty One
It was Hannah's 21st Birthday yesterday, she is my eldest son's girlfriend - this is the gift that I made her.
I used the stand up numbers from Anna Marie Designs and papers from the Sara Davies Shabby Chic Signature Collection.
After adhering the papers I sanded the edges of everything and inked the edges with Distress Ink.
The butterflies are from a Crafter's Companion die, the flowers, gems and ribbon are from my stash.
Thank you for calling today, your company is much appreciated - please leave a comment so that I can come and visit you.
Pauline
x
Saturday, 19 August 2017
Beside the seaside ...
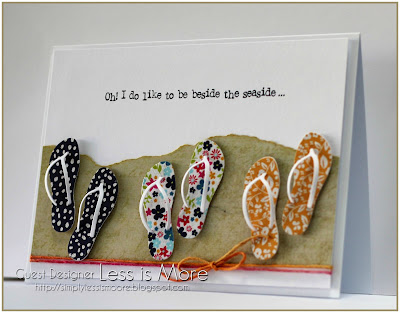
I am absolutely thrilled to be Guest Designer at Less is More this week, thank you so much for inviting me ladies. The theme for the week is 'Your Perfect Holiday', well my perfect holiday is relaxing by the sea - preferably on a lovely sunny day.
I used my Sue Wilson Flip Flops die to cut three pairs of flip flops from the papers in this month's Julie Loves Creativity Box - they are quite fiddly to put together but I think they are worth it, my inspiration came from a card that I saw on Pinterest a long time ago.
The torn paper is from the Sara Davies Shabby Chic Signature Collection and the sentiment is from Pink Petticoat, now trading as The Lovely Studio.
To finish my card I added some twine secured with bow.
Thank you for visiting my blog today, make sure you pop over to the Less is More Challenge Blog and check out the fabulous DT inspiration, I do hope you will be inspired to play along.
Pauline
x
Friday, 18 August 2017
A quick tutorial
If you are a regular visitor to my blog you might remember a series of Z-fold cards that I created for Simply Cards & Papercraft magazine.
As part of the commission I created two step by step tutorials and as the magazine is no longer available I thought I would share one of them on my blog.
This is the finished card, it is a beginner design.
Score a 30 x 20 cm piece of card stock at 7.5 cm and 15 cm.
Trim 5 cm from the card stock to create two separate panels.
Valley fold both pieces of card stock along the 15 cm score line and mountain fold along the 7.5 cm score line.
Rotate the smaller panel and cover the front panels with pattered paper, I always leave a narrow border around the outside.
Adhere the narrower strip to the card front to form the 'Z' shape.
Decorate as desired.
I hope this step by step is helpful to those of you that haven't created a Z-fold card yet.
Thank you for visiting my blog today.
Pauline
x
As part of the commission I created two step by step tutorials and as the magazine is no longer available I thought I would share one of them on my blog.
This is the finished card, it is a beginner design.
Score a 30 x 20 cm piece of card stock at 7.5 cm and 15 cm.
Trim 5 cm from the card stock to create two separate panels.
Valley fold both pieces of card stock along the 15 cm score line and mountain fold along the 7.5 cm score line.
Rotate the smaller panel and cover the front panels with pattered paper, I always leave a narrow border around the outside.
Adhere the narrower strip to the card front to form the 'Z' shape.
Decorate as desired.
Thank you for visiting my blog today.
Pauline
x
Subscribe to:
Comments (Atom)


