Showing posts with label Tags. Show all posts

Monday, 4 October 2021

Mini Monday

I have a couple of Christmas Tags to share for Mini Monday today, I have used the Watercolour Christmas collection by Sara Davies.


They are both quite simple, I have used a couple of the 6 x 6 papers and some white card stock to create a little winter scene on the one above, the snowman, bucket of snowballs, and tree are from the die cut elements, I cut the tree in half so I still have half left for another tag or card.

I have created a little shaker on the one below, I used one of the small toppers from the 6 x 6 pad along with one of the papers.  I embellished my tag with some die cut snowflakes from the collection and some little die cut presents.


Thank you for visiting my blog today, please leave a comment so that I can come and visit you.

Pauline
x

Monday, 16 August 2021

Bird Watcher

Sorry I haven't been around for a while, my eldest son came to visit for a few days so I was spending time with him.

This is the completed album that I created after taking part in the most recent Facebook Live class held by Clare from My Creative Spirit, it was number 23 and we made a window box and album.

Below you can see the album inside the window box, I used a combination of papers from the Graphic 45 Bird Watcher collection - you can see more details and photographs of the window box HERE.


Next you can see the inside of the front cover and the front of the first page, the front cover has an acetate flap, there is another flap on the first page, both flaps are secured with a magnet.


The next photograph shows the flap on the inside cover open to reveal a pocket, I  have placed a journal card in the pocket but you could also put a photograph in it.


Now you can see the flap on the first page open, there is a small tuck point that I have placed another journal card in.


Next is the back of the first page with a place to display a journal card or photograph and the front of the second page with a flap that has a pocket on it, again I have placed journal cards in the pocket but you could place photographs here as well.


Below you can see the open flap with a journal card in the small tuck pocket.


On the back of the second page I used my Stitched Slots Pocket Die to create the pockets that have journal cards in them, on the front of the third page there is a place to display a journal card or photograph.


The third page with the flap open.


The back of the third page with a photo mat and the front of the final page, this one has a small pocket in which I have placed a small journal card and a small tag.


The flap opened to show a journal card in the small tuck pocket.


The back of the last page with a side pocket that I have placed a tag in and the inside of the back cover which is a repeat of the inside front cover with an acetate flap.


The flap opened to show a pocket with a journal card in it.


Finally, these are the two tags that I have placed in the pockets.


Thank you for visiting my blog today, your company is much appreciated - please leave a comment so that I can come and visit you.

Pauline
x

Sunday, 1 August 2021

Friends Fur-ever

This is the completed album that I created at last weekends Craft Retreat run by Clare from My Creative Spirit, I used the Graphic 45 Well Groomed collection - it has taken me a while to finish it but I got there in the end.


Above is the front of the Album, I fussy cut the main image.  Below is the inside front cover, it has a pocket with an acetate front photo holder and a belly band with a pull out photo book.  You can also see the front of the first page, it has a pocket with three little tags in it.


There are six pages in total, three page designs, in three different sizes, they are different on each side and then repeated in reverse order - each page has a pocket with a photo mat inside.  This is the back of the first page with a little fold out photo holder.  The front of the second page has a large pocket with another photo wallet.


Next is the fold out photo holder opened out and the large pocket with the photo wallet removed.


Now you can see the back of the second page, it has a large pocket with two journaling cards stored in it.  The front of the third page has an acetate fronted photo holder on it, I have placed a journal card inside.


This is the centre spread, first you can see the reverse of the third page and then the pages begin to repeat and you can see the front of the forth page.  They both have a belly band that you can tuck photographs behind, I have popped a journal card in mine.


This is one of the acetate fronted photo holders and the three little tags.


Two of the photo wallets.


Finally, the photo wallets opened out, I think I might use this album to store some of the many photographs that we have of our two Black Labradors.


Thank you for popping in today and thank you for all of the lovely comments that you leave, they are all read and much appreciated.

Pauline
x

Tuesday, 13 July 2021

Oriental Happiness

I have been making some more tags, they are to go in a mini album that I am in the middle of creating.


I have used my Graphic 45 Bird Song collection, on the first tag I used two papers from the collection along with a tag and some fussy cut birds, the sentiment is also from the collection.


On the second tag I used three of the papers, some fussy cut lanterns and a label from one of the sticker sheets - I fussy cut the butterflies from the Prima My Sweet collection.  I also added a seam binding bow two both of the tags.


Thank you for popping in today, your company is much appreciated - please leave a comment so that I can come and visit you.

Pauline
x

Sunday, 25 April 2021

Wonderful Friend

I'm still busy creating the album that was part of the online Craft Retreat that I joined last weekend, I created these tags to go in one of the album pockets and thought I would pop in and share them with you.
 

My inspiration came from some tags that Teresa Cruz shared on the Graphic 45 Blog.  I used two large black tags and covered them both with papers from the Blossom collection.   I then punched one edge of two 4" x 6"Journaling & Ephemera Cards and distressed the edges.


I fussy cut lots of flowers from one of the 12" x 12" patterned papers and layered some up on each tag.  The sentiments are old ones from my stash and I added a couple of seam binding bows.


Thank you for visiting my blog today, your company is much appreciated - please leave a comment so that I can come and visit you.

Pauline
x

Thursday, 1 April 2021

Spring Botanic

I have created a double pocket card with my Stamperia Spring Botanic collection, I like this card design because you can create it with one sheet of 12 x 12 paper or card stock - there are lots of tutorials on YouTube.


I made my card base from a sheet of 12 x 12 cream card stock and used two of the beautiful papers to cover it.  I fussy cut three tags from the paper collection, there is a sheet containing twelve beautiful tags, to place in the pockets.  I attached the topper and label to some more of the cream card stock and inked the edges of everything.


This is a close up of the three tags that are in the pockets.


Thank you for visiting my blog today, please leave a comment so that I can come and visit you.

Pauline
x

Monday, 13 July 2020

Farmhouse Album

I thought I would join one of Clare Charvill's Facebook Live classes, I can't join the entire class live as it starts at 6 pm and we are still cooking dinner then but you can catch up at any time - it suits me better to follow at my own pace.  They are brilliant classes and Clare is very clear and precise - there have been five so far, class 6 is scheduled to start on Friday, 17th July - you can find the details HERE.

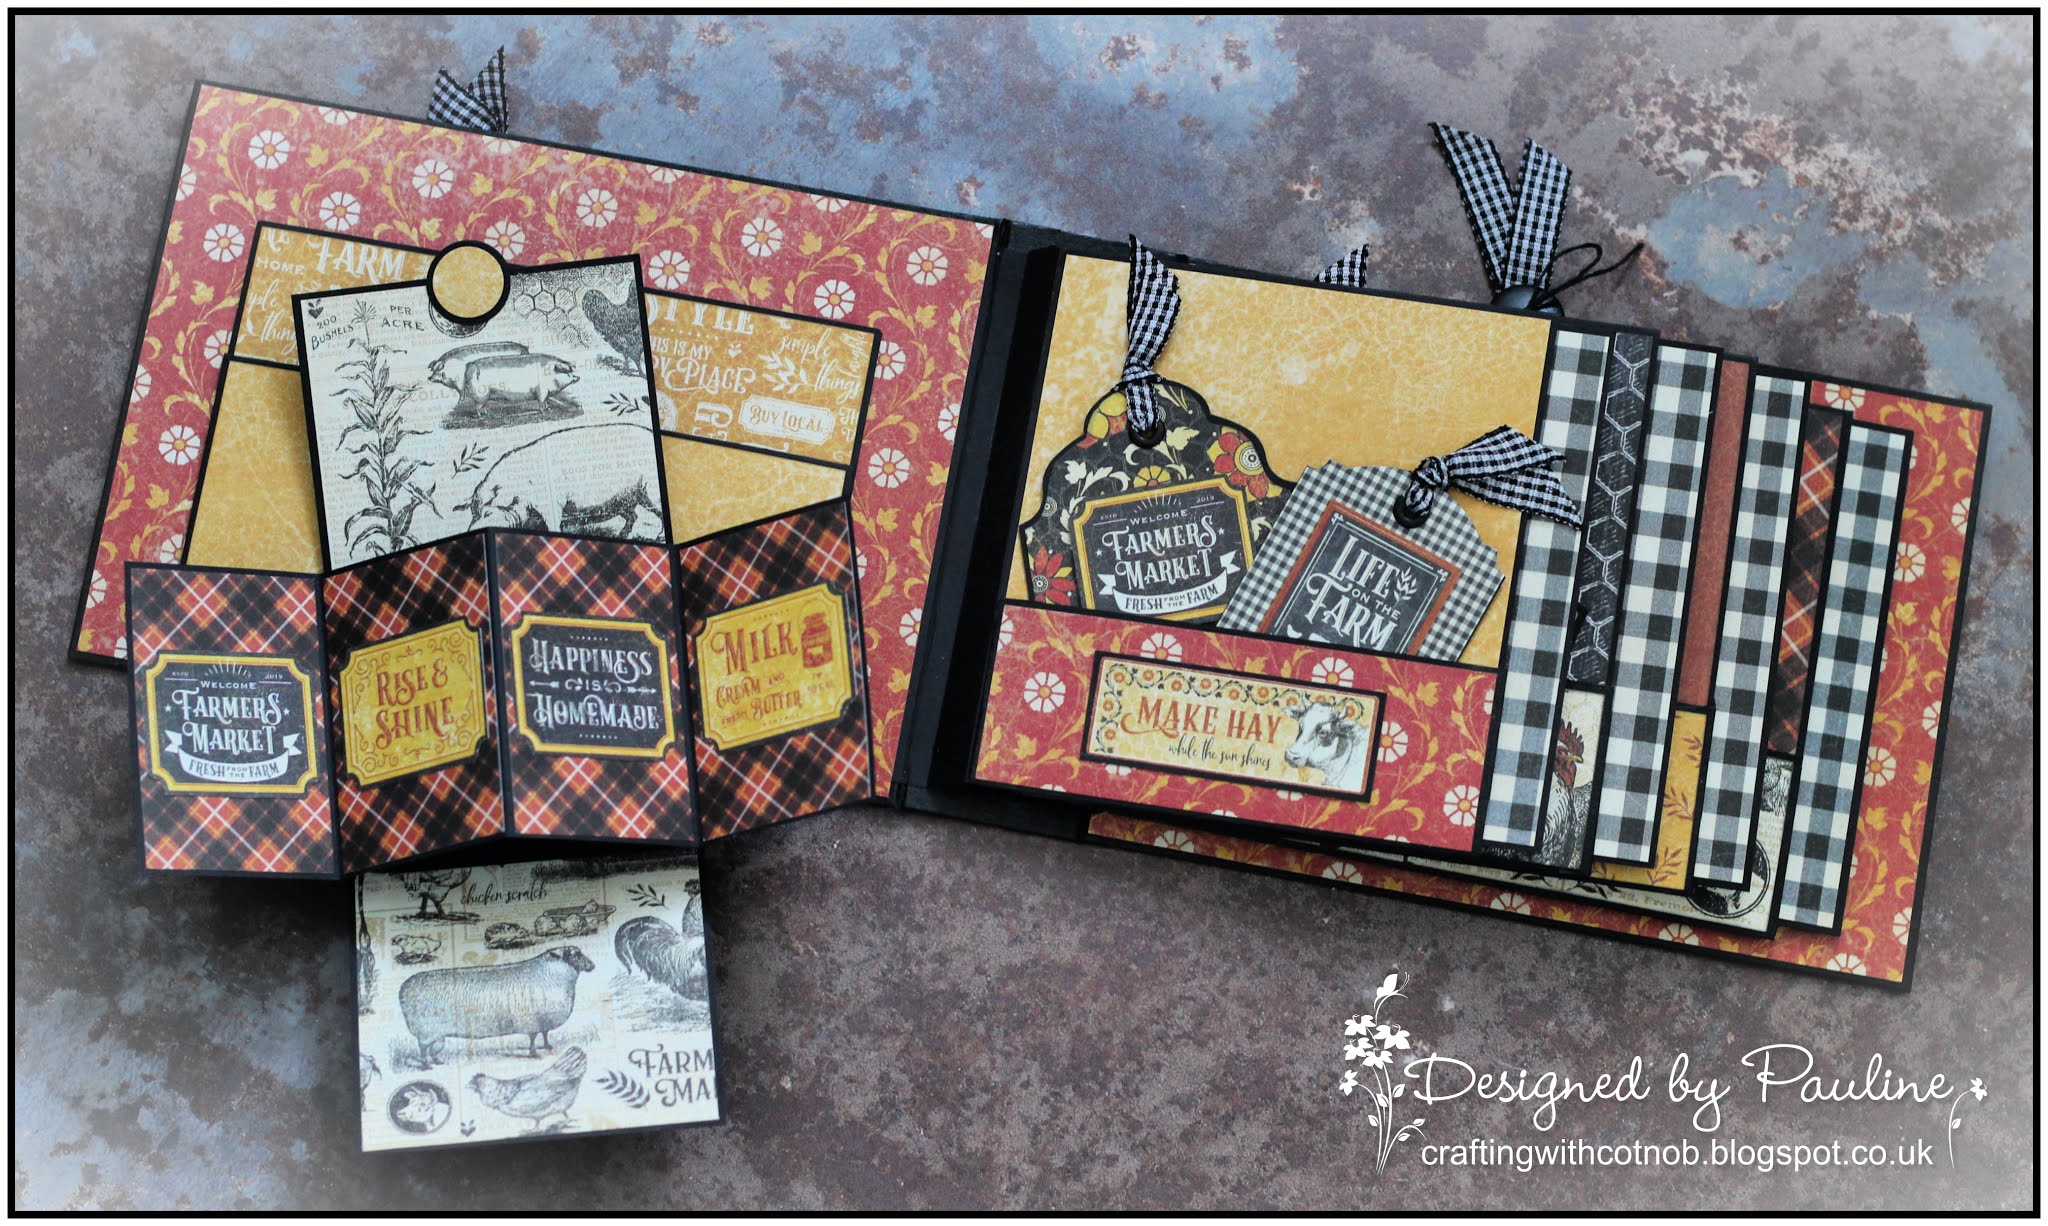
This was Class No. 2 - The Teeny Weeny Tag Album Class, it's not that Teeny Weeny, the finished album measures 7½ " x 5½ ".  I used papers and elements from the Graphic 45 Farmhouse Collection.

This is the front cover.


The inside front cover, it has a pocket with a twist and pop card in it along with the first page that also has a pocket for a couple of tags.


The twist and pop card (or Ta Da! card as Clare calls it).


The back of page one, it has a band that you can pop photo's or journaling cards behind and the front of the second page, this has another little pocket for tags or ephemera cards.


The back of page two and the front page page three, both with more pockets.  Each page has a pocket on the outside edge that contains a photo mat, I will show you them later.


The back of page three with a little tuck spot and the front of page four with the large tag that I shared last week. 


The back of page four and the inside of the back cover, the inside front cover and inside back cover are both the same.


This is the front of the photo mats.


This is the back of the photo mats.


These are all of the little tags that have been tucked into the pockets.


I would highly recommend Clare's classes, she is very professional and explains everything really well in the Facebook Live, this is the first time I have created an album from scratch.  She shows you how to create the album in two different ways, how to add the spine and all of the pages, you also receive a full supply list, tool list and cutting guide.

Thank you for popping in today - please leave a comment so that I can come and visit you.

Pauline
x

Sunday, 9 June 2019

You're stuck with me

I created this card for the June edition of Making Cards Magazine, for this one I used the free email craft papers, sign up to receive the email newsletter via the Making Cards website and you will receive the next set.


There are ten fabulous succulent toppers and two patterned papers in this collection, I just added some cardstock and a computer generated sentiment.


Thank you for visiting my blog today and thank you for all of the lovely comments that you leave - they are all read and very much appreciated.

Pauline
x

Friday, 23 November 2018

Midnight Garden Tags

I created a little box containing a collection of tags using the Hunkydory Midnight Garden Mirri Magic Topper Deck and card stock from the Topper Collection.

I cut the base from gold Mirri using one of my Moonstone dies,  I then added a layer of card stock from the Topper collection followed by another layer of gold Mirri.  Finally I added one of the beautiful toppers from the Topper Deck along with a little piece of ribbon secured with a twine bow.


Thank you for popping in today, your company is much appreciated - please leave a comment so that I can come and visit you.

Pauline
x

Friday, 6 October 2017

A New Nest

I'm really having fun playing with my stash now that I have stepped down from all of my Design Teams, I used the Craft Consortium Bloom Beautiful paper pad to create this card.


I  have created a Double Pocket Card, everything is from the paper pad including the tags and sentiment.  I fussy cut the bird from the front cover, there are lots of bits and bobs that you can fussy cut.  I think you will be seeing a lot more of these beautiful papers!


Thank you for visiting my blog today, your company is much appreciated.

Pauline
x

Tuesday, 8 November 2016

Golden Love Birds

Another Crafter's Companion card today, I promise there are not many left now, I'm just trying to post something that is not Christmas!

This one uses another of the Die’sire Fancy Card Blanks, this is a Centre Fold Back Card, I like this design, I certainly wouldn't bother to make one - the card blanks make it really easy.  The die is the Die-sire Create-a-Card Love Birds, I cut it out of the Kraft card blank and gold cardstock.


I inked the inside of my Embossalicious Elegant Orchid 8 x 8” Embossing Folder and embossed some Kraft card stock to create the background.


I created the flower using the Die’sire Classiques Delicate Flower die and the tags using the Die’sire Mixed Media Gift Tags die.


I would like to enter this card into the following challenges:

Animal Friends Challenge 44 - Special Fold Card
Card Mania Challenge 86 - Tag, you're it!
Mod Squad Challenge - Go for the Gold
Morgan's Art World Challenge 22 - Embossing Wet or Dry

Thank you for visiting my blog today, your company is much appreciated.

Pauline
x