As part of the commission I created two step by step tutorials and as the magazine is no longer available I thought I would share one of them on my blog.
This is the finished card, it is a beginner design.
Score a 30 x 20 cm piece of card stock at 7.5 cm and 15 cm.
Trim 5 cm from the card stock to create two separate panels.
Valley fold both pieces of card stock along the 15 cm score line and mountain fold along the 7.5 cm score line.
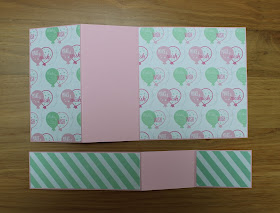
Rotate the smaller panel and cover the front panels with pattered paper, I always leave a narrow border around the outside.
Adhere the narrower strip to the card front to form the 'Z' shape.
Decorate as desired.
Thank you for visiting my blog today.
Pauline
x


Brilliant clear instructions - I haven't created one before so as soon as I'm out of these PJs I'm off to my crafty corner to make one. Thanks Pauline, so very helpful. x Anne
ReplyDeleteA great easy to follow tutorial. I've never made one either so you may be seeing one soon! Thanks Pauline x
ReplyDeleteThanks for a great tutorial Pauline, I really am going to give this a try.
ReplyDeleteSuch a pretty card.
Janice x
Lovely Birthday card! Thanks so much for the clear tutorial on Z-fold, it seems very simple!
ReplyDeleteFantastic birthday card Pauline, great instructions too.
ReplyDeleteWonderful tutorial and really clear instructions. Must try it out xx
ReplyDeletesorry I've not visited in a while Pauline , I keep losing my internet connection , very annoying .
ReplyDeleteLove the colour combo of your card , the tutorial is great , I'll give this one a go .
jane x
The best tutorial, great result.xx
ReplyDelete[aNNie]
Another super card Pauline and great tutorial too ;) Viv xx
ReplyDeleteSuch a clear Tutorial Pauline! Thank you for sharing!!
ReplyDeleteCheers
Dr Sonia
Beautiful shape card.
ReplyDeleteSimple tutorial and Wonderful card, thank you Pauline.
ReplyDeleteFaith
x
Very clear instructions Pauline and a lovely card, thank you, Kate x
ReplyDeleteVery clear instructions, thank you for sharing how they are made
ReplyDeleteHi Pauline,
ReplyDeletevielen Dank für das Tutorial. Du hast es super erklärt und durch die Bilder kann ich es sehr gut nachvollziehen. Mein Englisch ist nämlich nicht gut und die Übersetzung manchmal etwas unverständlich. Diese Art der Karte gefällt mir sehr gut. Das werde ich auch einmal ausprobieren. Hugs Silvi
Thank you for your tutorial Pauline, Looks simple now.. Love this shape..
ReplyDeletehugs
Ans x
A super tutorial with easy to follow steps. Hugs Jennifer xx
ReplyDeletefab and beautiful Pauline
ReplyDeleteGr Karin
I tried my first one a little while ago, such a simple idea but very effective. Fab card
ReplyDeleteA fabulous card and tutorial Pauline
ReplyDeleteLorraine x
Beautiful card as always - thanks for sharing the tutorial - have a great weekend!!!
ReplyDeleteSuch a great step by step, pretty colours too xx
ReplyDeleteGreat step by step tutorial Pauline .. .. I bet we will be seeing lots in blogland now!
ReplyDeleteHope all is well with you.
Have a lovely weekend.
Love Jules xx
Great design. Fabulous card x
ReplyDeleteThank you so much for sharing the tutorial. I've been wanting to make one. Your tutorial makes it so easy to remember. Beautiful card.
ReplyDeleteWonderful card, dear Pauline.
ReplyDeleteAnd thank you so much for this tutorial.
Hugs
Melodie
very beautiful card Pauline.
ReplyDeleteHugs
Kuni
Hi Pauline,
ReplyDeleteNice card and thanks for the tutorial!
Xx Linda
Thank you so much for sharing your tutorial Pauline, I keep telling myself I need to try different shapes and folds and this looks like a great one to start with :)
ReplyDeleteHugs Kaz xx
have a great weekend!!!
ReplyDeleteดูหนัง
great tutorial and wonderful card!
ReplyDeleteA great tutorial Pauline and a very pretty card. Barbxx
ReplyDelete